Contribute using Git Flow
How to set up a branch, commit, and open a pull request following the conventions this repository actually enforces.
1. Make sure Git is installed and up to date
git --version
2. Clone the repository and start from develop
git clone https://github.com/tuProlog/2p-kt.git
cd 2p-kt
git checkout develop
git pull
develop is the integration branch: new work branches off it and merges back into it. master tracks
released code.
3. Create a branch for your change
Name the branch after what it does, prefixed by its kind — this repository's history uses feature/<name>
(or the shorter feat/<name>) for new features and fix/<name> for bug fixes:
git checkout -b feature/my-new-thing
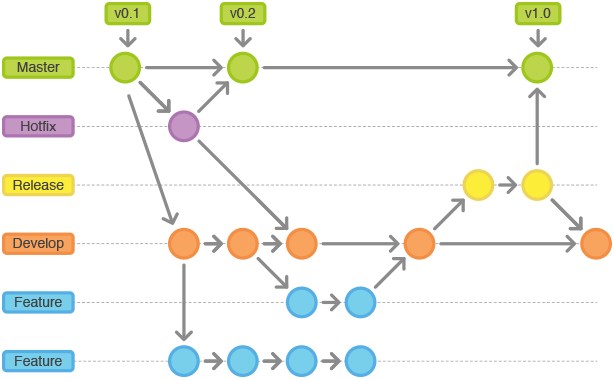
4. Commit using Conventional Commits
This repository enforces the Conventional Commits format on every
commit message via a Git hook, configured in settings.gradle.kts:
gitHooks {
    commitMsg { conventionalCommits() }
    createHooks(true)
}
The hook is installed automatically the first time you let Gradle sync (createHooks(true)), so running any
Gradle task once (e.g. ./gradlew tasks) after cloning is enough to activate it. A commit message that
doesn't start with a valid type — feat:, fix:, chore:, docs:, refactor:, test:, ... optionally
followed by (scope) and/or a ! for breaking changes — will be rejected. For example:
git commit -m "feat: add support for XYZ"
git commit -m "fix(parser): handle empty clause bodies"
This matters beyond style: releases are cut automatically from these messages (via semantic-release), which
decides the next version number and changelog entry from the commit types you use.
5. Push your branch and open a pull request
git push -u origin feature/my-new-thing
Open the pull request against develop (not master), keep commits focused and reasonably small, and make
sure ./gradlew build passes locally before requesting review.